Packing your kitchen can sometimes be one of the most overwhelming parts of your Houston move. With every fragile piece or small bit that we store in our kitchens, it can be time-consuming that can take up a better part of a packer’s day.
One frustrating issue is that you have to use your kitchen right up today you actually move out and it contains more items and appliances per square foot than most of the other rooms in your home! Like most things, timing and good planning are your allies as your face-off with the daunting task of packing a kitchen.
The good news is our expert moving tips by a houston moving company can make packing your kitchen a lot easier.
Start the process by making sure you have all the necessary supplies:
- Cardboard boxes. You’ll need medium-sized moving boxes that are strong and damage-free. Also, get a few dish boxes where you’ll pack the extra-fragile kitchen items such as plates and glasses. Dish boxes, aka dish barrels, provide better protection for your breakables because they are made from double-layered corrugated cardboard.
- Packing paper. You’re going to need A LOT of wrapping paper when packing up your kitchen items. One big pack of clean, white newsprint paper goes for around $10 (200 sheets) and can be ordered online or purchased from the nearest home depot store.
- Packing tape. Be sure to buy the most durable tape you can buy. This is where you don’t want to go cheap on. You want to guarantee that the paper bundles, bubble wrap bundles, and cardboard boxes you wrap with it won’t unseal or open during transport.
- Bubble wrap. Bubble wrap will give you that protection for any kitchen items that prove to be too fragile or too sharp to be safeguarded with paper alone. Get the biggest roll of the air-filled plastic material you can find as you’ll surely use it for other rooms as well.
- Furniture blankets. You’ll need thick moving blankets to protect the large appliances in your kitchen. This could mean your refrigerator or dishwasher in case you are taking them with you.
- A black marker. One or two black marker pens to label all your filled cardboard boxes should be sufficient. Careful not accidentally pack them in your box as. they can be easily misplaced.

1. Make a Meal Plan
Make a meal plan for the last two weeks prior to your move. Plan meals so you can go through the food you already have in the home. Go through the more perishable foods first, things like fresh fruits and vegetables, and finish up with frozen and nonperishable foods. In the final days leading up to the move, it will be convenient to order a pizza or pick up take-out.
Look for coupons early on so you can have them handy come moving day. When things get crazy, take a break with the family and enjoy a nice meal at a local restaurant. Your sanity will thank you!
2. Donate Nonperishable Food
Get rid of the food you won’t need. Is there a can of kidney beans that you have leftover from the first time you moved, it is probably a good idea to get rid of it. Check the expiration dates on items in the pantry and sort out what can be donated and what you should toss out. The Houston Food Bank takes donations through its “Fill the Barrel” program, often found at most local grocers. Below is their list of most needed items:
- Protein items
- Canned tuna or chicken, packed in water
- Canned stews and pasta/meat, easy on salt and fat
- Peanut butter
- Packages of dried beans
- Canned fruits in a light syrup, natural applesauce
- 100% juice cans or boxes
- Canned vegetables, tomatoes, tomato sauce
- Soups with meat and/or beans, meal-in-a-can, easy on salt and fat
- Cereals and cereal bars, easy on sugar and fat
- Pasta, spaghetti, macaroni, noodles
- The Houston Food Bank is unable to accept:
- Open packages
- Homemade food items
- Perishable foods
- Baby food
- Items with “expired” dates
3. Use a Cabinet Numbering System
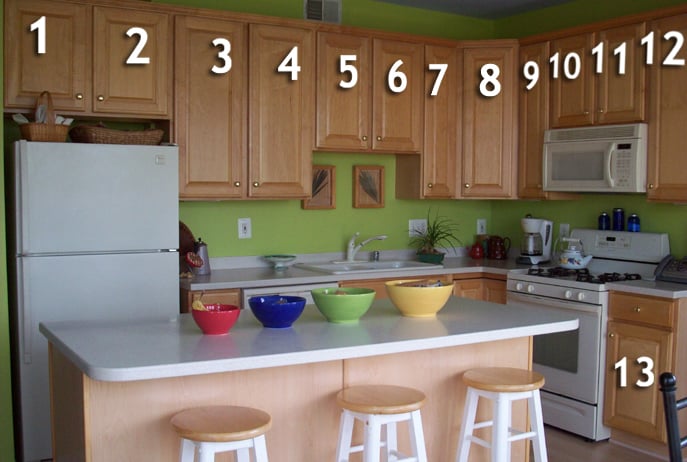
We have to tip our horns to Amy over at the “Fresh and Fancy” blog for this great tip! Create an organization system based on the number of cabinets in your kitchen.
As you pack items, you can also keep inventory based on the cabinet number. As Amy points out, if you know the layout of your new kitchen, you can even plan how you will organize your new space in advance!
**Bonus Tip! **
“Kiss the ugly frog first.” – Zig Ziggler
In other words, start with the job your dreading the most. It is going to be tempting to take that junk draw and dump it into a box. Don’t do it! You will just be moving a messy problem from one home to the next. Take some time and sort through what you need and what you do not.
4. Clean Appliances as You Go
Everyone has that one knick-knack lurking in the back of their cupboard that they haven’t seen since they unwrapped it the day after their wedding day. Odds are its pretty dirty even though you’ve never even laid eyes on it. Keep some paper towels and a little cleaner handy as you pack up appliances so you can clean as you go.
5. Packing Food
Start with spices. This is a good time to check expiration dates and throw out any spices that are no longer any good. As you pack up pantry items, keep some tape handy so you can tape any open boxes or bags closed. Anything that could potentially leak like flour bags or powdered mixes, put them in a one-gallon, sealable bag so any mess is contained.
6. Create a Kitchen Kit
Imagine the first day you are moving into your new home. As soon as you walk into your new kitchen, what are you going to want? Cleaning supplies? Water and snacks? A bottle of Champagne?
Odds are the items you will want on your first day in your new home will be the same things you needed on the last day in your old home. Do NOT pack those essential items. Instead, create a “Kitchen Kit” and include a few plates, forks, knives, paper towels, and dish detergent. If you are a coffee addict, a coffee pot, mugs, creamer, and/or sugar are probably a must.
7. Packing up Dishes
Wrap dishes, plates, bowls with sheets of packing paper. In a pinch, you can place dishtowels between plates and bowls. Just be sure that they are packed securely and cannot move around inside the box. Dishes are very heavy, so don’t try to pack them all into one box.
Glasses and stemware should be packed in boxes with cell divers, often you can find these inside liquor boxes (see our post on finding Free Boxes). Most importantly, take your time packing dishes and use plenty of packing material to pad the contents. Padding and securing dishes are the key to a safe transit.
Conclusion
If you would rather hire a Houston professional packing company, be sure to call us for an estimate.
Get ready for your upcoming move by downloading our moving checklist. The Blue Ox Moving Checklist helps to alleviate the stress of moving. This free moving checklist is comprehensive and can guide you from start to finish.